
Setting up Automatic Build & Deploy of a Jekyll Blog
In the previous post I demonstrated how to set up a spellcheck & lint action for a Jekyll powered site. The final piece in our GitHub actions automation puzzle is to build & deploy the site without having to do anything manually. The goal is to create the following actions:
- On every pull request, run a
jekyll buildto assert that the site can be build successfully ✅ - On every push to master, run
jekyll buildto produce the static site 📦 - On every push to master, deploy the site using SSH 🚀
- On every push to master, purge the Cloudflare cache 💨
Just as before, I will be using GitHub actions.
Assumptions
As of the time of writing, my blog is hosted on a web server controlled entirely by me. This means that deploying the site is as easy as copying files over SSH. Your setup may vary (and mine will certainly change as well - I always have plans for improvement 😀). You don’t have to do it the same way I do, here are some alternative ways to host a Jekyll site:
- Amazon S3 (probably the cheapest for low traffic blogs)
- GitHub Pages (low entry barrier, very solid GitHub integration)
- Other platforms
For me this blog is more of a fun learning experience so I will go the 100% manual way. Of course manual does not mean repetitive, the goal still is to automate as much as possible. I just also want to write as much automation myself as is worthwhile 😛
Let’s get to it!
Build Action
The goal of this workflow is to build the Jekyll site, just to see if it’s successful or not. We will take care of the actual deployment in a later action, only to be performed when pushing to the master branch. However it is still worthwhile to run a jekyll build to ensure that the site can be built, and that Jekyll does not error out. This way we can ensure that code that is merged to staging or master will actually result in a site that at least compiles 😛
Let’s take a look at the code:
name: Build

# Controls when the action will run. Triggers the workflow on push or pull request
# events but only for the master branch
on:
  pull_request:

# A workflow run is made up of one or more jobs that can run sequentially or in parallel
jobs:
  jekyll:
    runs-on: ubuntu-latest

    steps:
    - name: Checkout
      uses: actions/checkout@v2

    - name: Build
      uses: SebasWild/jekyll-build-action@445d650279c45fd66c59ddd38620ddb30fceaedf
Just like the last lint action, this one is pretty simple. Originally I was using Jerry van Leeuwen’s jekyll-build-action, but I got some errors downloading the Ruby gems the site requires, so I forked the repository and modified the base docker image it used from the latest version of Jekyll to Jekyll 3.
Deploy Action
Arguable the most complex action (comparatively) for my blog is the deploy action, since it runs through several steps:
- Run
jekyll build - SSH into the server & copy the generated files
- Purge Cloudflare cache
This action took a bit of tweaking to get right, especially narrowing down the parameters required to correctly rsync all the files over to the server. Here’s the code:
name: Deploy

on:
  push:
    branches: [ master ]

jobs:
  jekyll:
    name: Build and deploy Jekyll Site
    runs-on: ubuntu-latest

    steps:
    - name: Checkout
      uses: actions/checkout@v2

    - name: Build
      uses: SebasWild/jekyll-build-action@445d650279c45fd66c59ddd38620ddb30fceaedf

    - name: Deploy to Server
      uses: easingthemes/ssh-deploy@v2.1.1
      env:
        SSH_PRIVATE_KEY: $
        ARGS: "-rzv --delete --delete-excluded --chmod=g+rwx"
        SOURCE: "./_site/"
        REMOTE_HOST: $
        REMOTE_USER: $
        TARGET: $

    - name: Purge Cloudflare Cache
      uses: jakejarvis/cloudflare-purge-action@v0.3.0
      env:
        CLOUDFLARE_ZONE: $
        CLOUDFLARE_TOKEN: $
Copy phase
The first two workflow steps are the same as for the aforementioned build action - after that it gets more interesting. I use Dragan Filipović’s ssh-deploy which uses NodeJS to ssh and rsync the built jekyll site files to my server. Notable here is the use of secrets - you definitively do not want to expose vital things like SSH keys to your server by having them in the code.
Instead of username/password authentication, it’s generally always recommended to use SSH keys (with a passphrase protected private key) with your server refusing password logons. This way you can only log on if you posses your private key and the server knows your public key. It can also be more convenient than username + password logon on since private keys do not necessarily have to be encrypted with a passphrase, so you could log on without typing anything in at all.
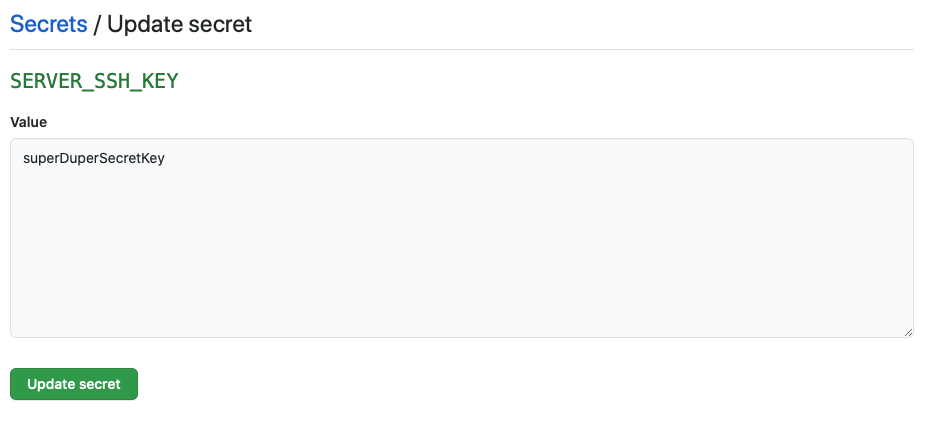
I make use of the above by storing such a private key in a GitHub secret - this SSH key allows the build action to log on to the server using a limited account with access only to the directory where the static files reside. Secrets are maintained on a per repository basis, and are basically key-value pairs. Once set, values cannot be read again, only overwritten. When the workflow is run, this SSH key is filled in to the environment variable SSH_PRIVATE_KEY.
The ARGS environment variable is the meat of the deployment workflow. It uses rsync, and in ARGS you can define the options to be passed to the rsync command, in this case:
-rrecurse into directories-zto compress files during the transfer-vfor verbose output for easier debugging--deleteto remove extraneous files in the destination directory (❗️important❗️)--delete-excludedto also remove excluded files in the destination directory--chmod=g+rwxto change permissions on the transferred files
The --delete options are important, as we want to make sure that the destination directory on our web server contains only the files that jekyll build produced. If the previous version of the site for example contained some content that is now removed, we do not want that to stick around.
The --chmod option might vary for your setup - but for me this was necessary as I wanted the group that technical user is part of also to have write access to the site contents.
The rest of the environment variables are easier to understand. SOURCE defines the directory where the files to copy are - in this case the results of a jekyll build are (as is usual) placed in the _site directory. The REMOTE_HOST defines the host where to deploy files to - e.g. swild.dev. REMOTE_USER is the username with which to use SSH, and REMOTE_TARGET is the destination directory to rsync files to.
Cloudflare Purge Cache
This blog is proxied by Cloudflare, simply to speed the site up a little bit. The server hosting this site is also seriously underpowered, with a 2010-era processor (single core!) and a measly 2GB of RAM. While it does not take a lot of resources to host a static website (and it’s not like this blog gets many views…), Cloudflare is perfect for ensuring fast load times even when the user is far away from where you host the site.
To ensure that everyone sees the same site content, we should purge the Cloudflare cache after a successful deployment so that for the first subsequent loads after Cloudflare will fetch the latest files from our origin web server. This can easily be done in the Cloudflare console, but it’s a lot more convenient to do via API 🤙
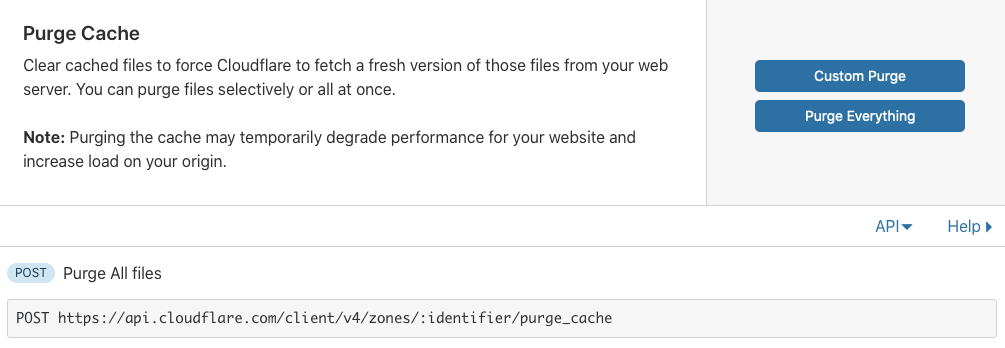
For this I use Jake Jarvis’s cloudflare-purge-action. It’s configuration is simple, although it requires some additional configuration on the Cloudflare side.
CLOUDFLARE_ZONE is the zone ID of your domain. This can be seen on the sidebar of the domain overview page, under the “API” header.
While it’s possible to use your global API key, it’s recommended that you set up a restricted token, one that is locked to just the zones that you specify. You can create such a token by navigating to your Cloudflare profile then navigating to the “API Tokens” and tapping “Create Token”. Configuration will vary for you, but generally you want to do something like the following:
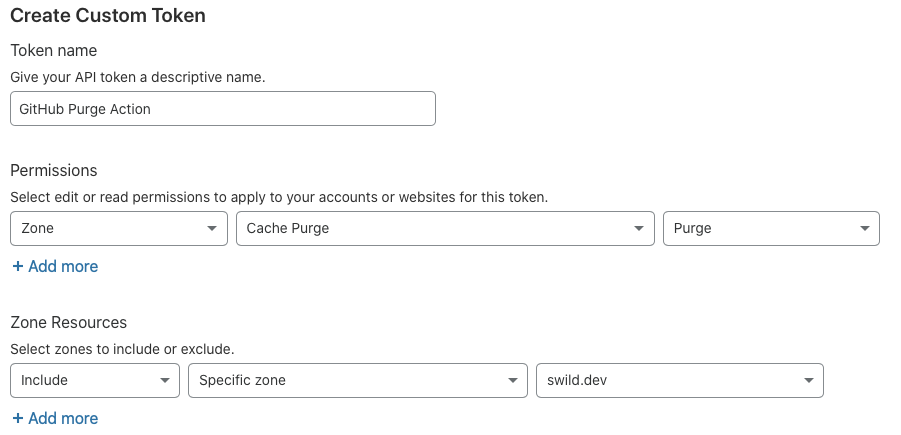
Note that the API token only has permissions to clear the cache for a very specific zone. That way if the key was compromised, all an attacker could do with the key is to clear the cache 😀
Results
After a not-so-insignificant time debugging permissions issues with the deployment workflow, I now have a pretty solid CI/CD pipeline. The checks & actions implemented above allow me to work on the site from anywhere and any device (barring local preview, which requires Docker), and a simple push to master triggers a release deployment. Pretty cool, right? 👍
