
Running Jekyll with Docker
TL;DR I share how to create a highly portable jekyll development environment. git-clone your website repository and run docker-compose up 🚀
Motivation
Normally, Jekyll requires a full Ruby development environment. This isn’t hard to setup, and the steps are described here. This is fine and good, but I wanted a fully portable environment without having to install Ruby or Bundler. For this I thought Docker is a good solution. This way, the only thing that needs to be installed wherever I am working on the site is Docker itself.
Docker
Docker is a platform that uses virtualization to deliver software in packages called containers. These containers are significantly more lightweight than full-blown virtual machines, as OS-level virtualization is used.
docker-compose
docker-compose is a command-line utility to work with docker-compose.yml files. Docker compose can be used to quickly define and run multi-container Docker applications with a single command and configuration file. A docker-compose.yml file contains everything from image configuration, network configuration, and commands to run when the containers start.
Read more here.
Jekyll docker-compose
For my personal site, I want a local development environment that is highly portable - ideally as easy as git clone-ing the repository and running docker-compose up. That’s exactly what the docker-compose.yml file below does 👍.
version: '3'                        # docker-compose file format. Ex. 1, 2, or 3.
                                    # Different versions work with different versions of Docker, and support different features

services:                           # Configs for the various services, we just have one
  jekyll:
    image: jekyll/jekyll:latest     # Image name to pull from Docker Hub
    command: jekyll serve --livereload     # Command to run when the container starts
    ports:
      - 4000:4000                   # Map local port 4000 to port 4000 in the container
      - 35729:35729                 # We need to specify another port for the Jekyll 3.70+ live reload feature
    volumes:
      - ./src:/srv/jekyll           # Mount a volume so the container can access local data in the src directory
Let’s break down the compose file.
-
The
servicesmapping is where we define our containers. In YAML, a mapping is basically a collection of key:value pairs. We can call each container what we’d like, and in this case we only have one - “jekyll” -
The
imageentry tells Docker what image to use. We could roll our own with aDockerfile, but there is a nice official Jekyll image available in Docker Hub that we can use. -
With the
commandentry, we can override the default command in the image. -
The
portssequence defines what ports to hook up from the container. The bundled web server in the image listens on port 4000, so we map this to our machine’s port 4000. We could choose a different one, ex:3999:4000 -
The
volumessequence defines what persistent data to connect to the container and where to mount it. In this case, I have my Jekyll source files in thesrcsubdirectory.
Let’s look at the command entry a little more closely. We can see that it passing some arguments to the jekyll command line tool:
-
servebuilds your site and serves it locally using bundled web server. -
--livereloadis very cool, it reloads your browser window when you make changes to your source files. Very handy for development.
Livereload
Introduced with Jekyll 3.7.0, this feature will auto re-generate the pages corresponding with your edits, and trigger your browser window to refresh (should you be previewing the site). Without this, you would have to use the --watch option and manually refresh the browser page to get the latest changes - but that’s one more click and you have to switch focus to your browser 😛 One thing to note though, at least on Safari I’ve found that when the page refreshes there’s a good chance that you lose your scroll position.
Also note that this feature works by injecting a new JavaScript file, livereload.js. This file listens for messages on port 35729, and will refresh the page when Jekyll re-generates a file. This is why we have to specify an extra port in our compose file.
Workflow
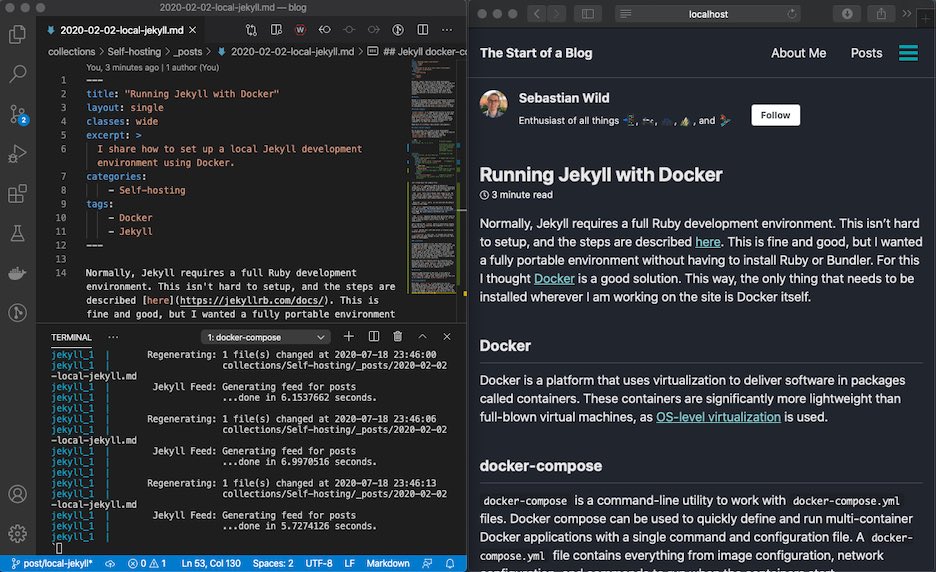
Typically when working on the site, I will have an editor (VS Code for me), and a browser pointing to localhost:4000 side by side. Starting work on the site is as simple as running docker-compose up 👍
Closing Remarks
Note that jekyll serve is only meant for use for development purposes. The web server that it uses is not meant to handle multiple incoming requests, and should really not be used in production. For deployment, I’d recommend running jekyll build and using a proper web server like NGINX or Apache to serve the site. I’ll have another post about this soon 😀